

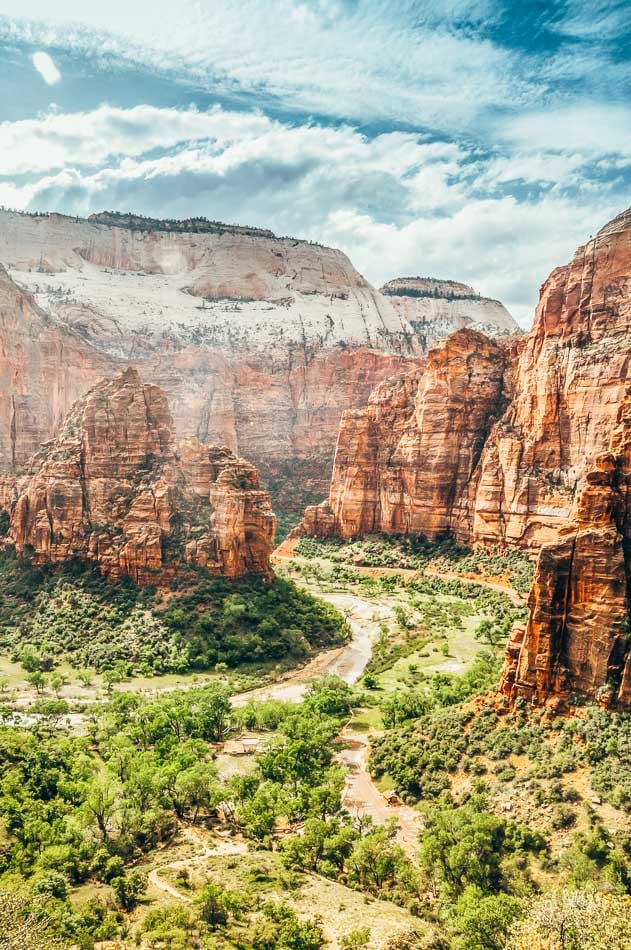
Zion National Park, Utah, is freaking beautiful. It’s what people are referring to when they say things like “the most amazing destinations in the United States are its National Parks.” The red cliffs rising high above the green foliage elicit the kind of awe that you can only find in other US National Parks.
For those of us who are self-described as “outdoorsy,” the whole park is one giant, exciting playground waiting to be discovered on foot, camping or rock-climbing gear in tow (or in my case, a day-bag full of snacks). Zion National Park is full of amazing day hikes that unlock its mysteries, step by step!
This post was contributed by Matt Burns, travel writer, adventurer, runner & budding coffee snob. Take it away, Matt! (Psst: want to write for us?)
Table of Contents
Psst: Looking for more places to explore in Utah? …. check out some of our other posts on things to do in Utah!
- 9 Awe-Inspiring Things To Do in Zion National Park, Utah
- The Perfect 10-Day Utah National Parks Road Trip Itinerary: Utah Mighty 5 Road Trip Guide
- Weekend Getaway Guide to Park City, Utah
- The 4 Best Salt Lake City Ski Resorts
Looking for other places to hike? Check out some of our other posts:
- The 8 Best Day Hikes Near Denver, Colorado
- The Best 8 Hikes Near Salt Lake City, Utah
- 10 Best Hikes in Southern California
Looking for more USA inspiration? We have a MASSIVE travel guide for all our favorite places in the US and handy advice, packing tips and travel guides. Click the link below to download!

About Zion National Park
Zion’s red-rock canyon, carved out by water millions of years ago, is 15-miles long, half a mile deep, and crosses three different ecosystems, with a history as unique as the rust-colored sandstone itself. When the area was first declared a National Monument back in 1909, it was actually called Mukuntuweap, which means ‘straight canyon’ in the Nuwuvi language, describing the narrow and cavernous lower part of the canyon.
Zion was Utah’s very first National Park and ever since its inception in 1919, has been quietly gaining a solid reputation as something of a true hiking mecca. Over the past few years, Zion has become a kind of buzz-word for adventure. It’s a park with a rep for tough hikes and insane views, plus some pretty incredible rewards.
And I mean, 3 million visitors a year can’t be wrong, can they?
It’s this reputation for adventure and great hiking that makes Zion National Park one of my favorite National Parks to visit in the US. If you’re a hiker or even just a lover of great views, this place is probably pretty high up your to-visit list too.
Much of Zion National Park is essentially a valley that has been carved out by the deceptively powerful Virgin River over the course of, well, a long time. This tiny little river might not look like much when you’re hiking alongside it (or even through it – more on that later), but take a second to look around you.
Like, look up. It did that.
Sheer, red sandstone cliff faces rise straight up out of the valley floor, carved out over thousands of years. The sort of steep, dizzying, death awaiting cliffs that make you look up and say “yeah…I could probably hike that”.
Wait. What are you talking about, Matt?! Ahhh come on…It can’t be just me who thinks like that, right?
I mean, let’s at least agree: if you’re planning a visit to this unique, geologically inspiring and historic park, then there’s no better way to see it than to get out and hike in it! And there are plenty of amazing hikes in Zion for every kind of hiker, from easy hikes to difficult ones.
Here’s a rundown of the best hikes in Zion National Park, plus everything you need to know about hiking in Zion National Park.

Hiking in Zion: Things to Know
Here are a few helpful tips to be aware of before going hiking in Zion National Park.
- Plan your hikes ahead of time
While a lot of day hikes in Zion National Park are on the top of everyone’s list to conquer before they leave, rockfall and other natural disasters (like flash floods, which are no joke in the desert) can cause immediate closure of trails, so it’s important to stay updated on trail conditions! Check the National Park Service’s Hiking in Zion page for closures and conditions before you head out each morning.
Fantastic alternatives to more popular hiking trails that may be closed are the Narrows hike (one of my personal favorites), Observation Point via the East Mesa Trailhead, The Subway (permit required), Canyon Overlook, and if you’re really up for an adventure, the West Rim Trail is an EXCELLENT selection!
- Some of the hikes in Zion National Park can get a bit sketchy in bad weather.
I’d recommend checking this link here for up-to-date trail conditions before setting off, and making sure you’re well prepared for all eventualities.
- Arrive early to avoid long waits.
Zion is one of the most beloved and popular National Parks. So, no matter which way you’re coming from and which entrance you’ll be accessing, you want to enter the park WELL BEFORE 9 am, otherwise you’ll be waiting for ages to get inside the park! And that’s crucial when taken into consideration with the next tip…
- Plan your hikes for morning or afternoon/evening to avoid the heat.
When visiting Zion in the summer, the most unforgiving part – other than some of the more palm-sweat-inducing hikes – is the brutal heat. If you can, you’ll want to avoid hiking in the head of the midday sun.
Plan to begin your hike for early morning or afternoon, when the sun is less strong – or aim to be in a shaded area at mid-day. That usually means you’ll need to be on the FIRST shuttle into the parks the morning!
In any case, bring plenty of water – either in a hydration pack or in insulated steel bottles, or heck, both – to stay cool. You’ll need it!
- The neighboring town of Springdale is full of amenities and supplies.
Springdale has quaint coffee shops, health food stores, and plenty restaurants. It’s the perfect place to fuel up before your hike and pick up food to take with you, whether you’ll be eating lunch with a view or finishing your hike up by noon!
Just remember: whatever you pack in for your hike, pack it out with you – that includes ALL of your trash and any leftover food. A Pringles can makes a convenient, spill-proof portable trash receptacle (and a yummy snack)!
- Pick up a Parks Pass before your trip!
If you’re planning to visit multiple parks during your trip – like more of Utah’s Mighty Five – we recommend picking up an America is Beautiful National Parks Pass. The pass is valid at over 2,000 National Parks and 10% of the sale proceeds are donated to the National Park Foundation, helping to keep our parks beautiful!

How to get around Zion National Park?
Getting around Zion National Park is very simple, but there are a few guidelines you need to know depending on when you’re visiting.
In a bid to cut down on congestion within the park and also to limit pollution, the National Park Service runs regular, free shuttle busses throughout the park and even out into the nearby town of Springdale, Utah. Certain parts of the park are closed to cars and you’ll only be able to access them via the shuttle or on foot (or on a bike, if that’s your thing). The shuttles are always really regular – they ran every 5 or 6 minutes last time I was there – but they run at different times of day depending on the season.
If you’re visiting Zion between February and November, the only way to get around the park is by using the free shuttle service. You’ll need to park your car somewhere in Springdale and then board the shuttle into the park. The National Park Service does this to reduce emissions pollution, traffic, and parking issues, so it’s really a blessing in disguise!
The first shuttle leaves the Zion Visitor’s Center at 7 am and the last shuttle leaves the Temple of Sinawava at 6:15 pm. Look for a full schedule at one of the park’s shuttle stops when you arrive.
Since you’ll be traveling on the shuttle’s set schedule, you need to make sure you don’t miss one of the next to last shuttles out of the park. It’s very important that you do not wait for the very last shuttle because there is an almost guaranteed chance that that bad boy is going to be filled to the brim, causing you to be well up sh*t creek without a paddle once you have to walk back to where you’re staying. Totally not ideal, especially when you’ve spent all day walking only to have to walk all the way back to camp or your hotel!
If you’re visiting Zion in December or January, the only way to get around is by your own car because the shuttles do not run, so parking is a free-for-all. Winter is less busy, but it’s not desolate, so waking up early is highly recommended so you can grab a parking spot!
Tips for Using Zion’s Shuttle System
One of my biggest tips for traveling Zion efficiently is knowing how to navigate the shuttle system. There are two separate shuttles that maneuver in and around Zion National Park.
The first loop goes through Springdale and makes nine different stops. This is the shuttle for you if you’re staying at the hotels, Airbnbs, or the campgrounds around Springdale. Board this shuttle at any of these stops to get to the Zion National Park Visitor’s Center:
- Zion Canyon Village
- Cafe Soleil / Thai Sapa / Cliffrose Lodge
- Flanigan’s Inn / Whiptail Grill
- Desert Pearl Inn
- Zion Pizza & Noodle / Bumbleberry Inn
- Bit & Spur / Hampton Inn / Holiday Inn Express
- Quality Inn & Suites Montclair / Driftwood Lodge
- Park House Cafe / Silver Bear Enterprises
- Majestic View Lodge
Once you’re inside the park, the second shuttle loop goes through eight popular stops throughout the park (listed below). You don’t have to worry about missing any stops since the bus driver will tell you when to get off for what you want to do.
- Zion Human History Museum
- Canyon Junction
- Court of the Patriarchs
- Zion Lodge
- The Grotto
- Weeping Rock
- Big Bend
- Temple of Sinawava
If you’re unsure of what to do, when you get to the shuttle stop look for a paper schedule for the shuttle and it’ll help you find your way. Trust me, it’s way less stressful than it seems! The bus drivers will always shout out the stop number over the tannoy and will usually also list the most popular hikes at each of the stops as you go. But just to be safe, check out the guide and make a note of your stop number.
- Zion Hiking Tip: For up to date information about the shuttle including where to pick it up and where each stop is located, check the NPS official guide.
Now that you’re safely prepared and ready to go, let’s hit the trails!


Day Hikes in Zion National Park
With so many options for stunning hikes in Zion National Park, it’s hard to narrow it down (get it? Narrow? Like THE Narrows? .. never mind). Below you’ll find the best hikes in Zion ranging from strenuous to easy, all of which can be completed as a day hike. So pick a hike and pack a lunch!
Angels Landing
- Distance: 4.1 miles | Elevation Gain: 1,617ft | Difficulty: Hard
- Altitude At Top: 5,790ft |Shuttle Stop: 6 | Trail Guide
It’s only right and fair that we kick off this post with an absolute Zion classic. This is the hike that most likely led you here in the first place, right?
Easily the most iconic hike in the park, Angels Landing is stunning, popular and treacherous in almost equal measure.
But, the terror of hiking the final, dizzying 500 feet ascent – while holding onto chains on a sheer, narrow stretch of rock – is also what makes the Angels Landing hike fun. It’s about the challenge.
Oh, and the view. It’s about that too.
The first half of the Angels Landing track is a leg-burning 1000ft ascent over a 2 mile distance, with the latter portion being made up of merciless, unforgiving switch backs. At this point it’s tough to know what’s worse – looking down to see where you’ve come from, or looking up to see where you still have to go.
But hey, it’s nice to be outside, right?
Once you’ve completed the switchbacks, you’ll be in the relative safety of Scouts Lookout. Time for a snack break.
From here, it’s dealers choice whether you call it a day here or crack on for the remaining 500 vertical feet to Angels Landing itself.
But, you came this far, so you should definitely push on. Unless it’s windy or icy, in which case forget it.
The section of the trail between Scouts Lookout and Angels Landing is where things start to get interesting. Imagine hundreds of people all trying to get up and down a long staircase barely wide enough for single file. With no banister.
It’s pretty chaotic at some points, but generally speaking, the trail seems to manage just fine.
- Zion Hiking Tip: For the best (and safest) Angels Landing experience, try to avoid hiking during busy peak times. Aim for early morning. Like, first shuttle bus kind of early (check the schedule here). The early morning alarm might not be a great start to the day, but it’s a much less crowded, safer and more enjoyable way to experience one of Zion’s most renowned hikes. And if you’re going that early, you do need to bring a headlamp.

Photo Credit 
Photo Credit


Observation Point
- Distance: 7.2 miles | Elevation Gain: 2,148ft | Difficulty: Medium
- Altitude At Top: 6,521ft | Shuttle Stop: 7 | Trail Guide or Shorter Alternative
The summit of Observation Point is at a higher elevation than Angel’s Landing, with marginally better views and a slightly clearer angle out over the Zion valley.
It’s also significantly less crowded. And you won’t feel like you might die trying to get to the top!
While everyone else is busy trying to battle their way up Angels Landing, you’ll be tackling the cheeky chipmunks at the top of Observation Point, who have grown far too accustomed to sharing your packed lunch. Sorry, guys. Not happening.
At the beginning part of the hike, you’ll climb up through neighboring Echo Canyon, which is beautiful in itself and is also home to some pretty cool rock cut-outs.
As you hike Observation Point, there are some sections with some very steep drop-offs, but it’s nowhere near the same level as Angels Landing and the path is always plenty wide enough for everyone. So if you’re terrified of heights, plummeting to your death, etc… Observation Point might be a better day hike option for you than Angel’s Landing.
If you fancy your chances against the chipmunk punks, you’ll need stop 7 on the shuttle. Look for the start of the East Rim Trail and Observation Point will be well signposted from there.
- Zion Hiking Tip: There are two ways to get to Observation Point. If you want to reap the rewards of an epic view via an easier hike, the East Mesa Trail to East Rim Trail is 4.4 miles out-and-back and is a very leisurely stroll to the lookout point.
- Zion Hiking Tip #2: If you plan to do both, do Angels Landing before you tackle Observation Point. I say that because, after you’ve seen the view from Observation Point, the one at the top of Angels Landing might not be enough to tip the risk/reward balance in its favor.
- Yet Another Tip: This hike is hands down one of the best photo ops in a park full of stunning photo ops! It’s also an excellent hike to do at sunset because you can experience dreamy, orange hues over Zion Canyon, and still get back to the trailhead safely. Looking for more? The Down Lo has a great guide on more National Park bucket list photo ops.

The Narrows
- Distance: Up to 15 miles | Elevation Gain: 1,017ft | Difficulty: Medium | Shuttle Stop: 9 | Trail Guide
This is another hiking in Zion “must do”! The Narrows hike is up there with Angels Landing as another iconic Zion day hike. It’s an extremely well-trafficked route that offers something different to anything you’ve ever done before.
In a nutshell, this hike will have you hiking through the Virgin River.
Not through as in across it.
But through as in in it.
For a river that’s carved out such a deep canyon, most of the time, the Virgin River is actually pretty shallow in some parts. The Narrows is a hike that takes full advantage of that fact, as it has you hiking straight through the path of the river and into the canyon.
You can make this hike as long or as short as you like – just turn around when you’re ready to go back – but the longer you push on for the further you get down the canyon and the cooler the hike becomes. As you continue, the canyon walls get closer and the going becomes more of everything.
You can access the start of the Narrows hike from shuttle stop 9, and you’ll need to start out following the Riverside Walk track. That’ll take you to the mouth of the canyon with a river coming out of it and the place that should really mean the end of a hike. Except that you’ll be continuing. Yup, into the river.
Dip your feet in and get used to that cold water. You’re going to be spending the next 5 or 6 hours in it.
- Zion Hiking Tip: Gear is incredibly important on this technically difficult hike. At the very least, you’ll need trekking poles and neoprene socks. Also consider river walking shoes, like these canyoneers. You can also rent the proper Narrows hiking gear from Zion Guru. And don’t wear cotton for this hike! You need clothing that will keep you warm and insulated even in cold water. The best hiking clothing for insulation when wet is wool, which naturally stores and releases water, keeping it warm when it’s cool and cooling you off naturally when it’s hot (see recommendations above in the “what to pack for Zion” section). For more suggestions and advice on the Narrows hike, here’s a helpful guide.
- Zion Hiking Tip #2: Consider avoiding the busy peak summer season for this popular hike. Shoot for the shoulder seasons instead. Wading through the ice-cold water without the summer sunshine to warm you up might not sound great, but the thinner crowds make it a price well worth paying. Plus it’s a great excuse to bring more hiking chocolate. You know…for energy, and all that.
Hidden Canyon
- Distance: 3.2 miles | Elevation Gain: 915ft | Difficulty: Medium| Shuttle Stop: 7 | Trail Guide
This hike is a great way to see a part of Zion that most people skip over completely or don’t even realize is there. I’m dubbing it the “secret” hike because for the most part, that’s exactly what it is.
The hike itself is relatively short. You’ll hike along the cliff face to the mouth of one of Zion’s iconic narrow canyons. But unlike the Narrows, this canyon is dried out and you can hike your way into it while keeping your feet nice and dry.
After hiking for about 3 miles, you’ll reach the end of the maintained trail. But don’t let that stop you.
If you can clamber your way up the rock small rock face that marks the end of the official trail, you can continue on up the canyon a little further for a taste of a relatively untouched hanging canyon.
Eventually, after you’ve scaled a couple of rock faces and skipped over a few boulders, you’ll come to a natural sandstone arch in the middle of the canyon: a perfect spot to have lunch before you turn around and hike back out!
- Zion Hiking Tip: You can access the Hidden Canyon hike from stop #7 on the shuttle bus. Start out on the Weeping Rock trail and then keep right at the fork.

The Subway
- Distance: 7.0 miles | Elevation Gain: 1,305ft | Difficulty: Hard | Trail Guide
This difficult Zion hike is called The Subway because a section of the hike resembles an underground subway tunnel, as the curved walls of the canyon close in overhead. Hiking it is a challenge, not only because you’ll need basic navigation and trail finding skills, but because it’s difficult to actually get access to the hike.
This remote and difficult-to-access hike is managed by the National Park Service, and a special permit is required all year round if you want to get onto it. Permits are allocated on a random lottery system, and you’ll need to apply well in advance if you want to make sure you get your hands on one for the right dates.
Why do you need a permit exactly? Well, the hike is extremely popular – and also very challenging. NPS needs to limit the number of people out here on the trail, but also monitor traffic into an area that requires extensive and often technical route-finding for those who choose to take it on. Basically, you want to leave a paper trail.
But if you’re up for the challenge, this hike is definitely for you.
The hike follows along beneath a canyoneering route: you’ll be following stream along a canyon to its peak, then turning around and heading back down again. You’ll be following a stream winding its way down a canyon, and at certain points, you’ll find yourself crossing the water. There are also swimming spots along the way, so bring a bathing suit to enjoy them!
Keeping track of the trail itself is another challenge, as there are multiple visible footpaths – and they’re not all the easiest options. And near the end of the trail, you’ll find some technically challenging rocks and terrain to scramble over. “Rock scrambling” is actually a beginning mountain climbing or rock climbing technique, and it can be intimidating and challenging for those who’ve never done it; read up on rock scrambling to prepare.
When done “bottoms up,” the start of the hike is strenuous, with a 450 ft descent over about 1/3 of a mile. As you continue you’ll pass waterfalls and cascades, before finally reaching “The Subway,” a section of the canyon where the walls have curved to form a series of tubes and glimmering emerald pools. This is the halfway point is at the Subway – take some photos and go for a swim to enjoy it before turning around and hiking back!
If you’re organized and lucky enough to get your hands on a permit, you should definitely make sure you do it. You can find all the Subway permit info you’ll need right here on the National Park Service website, and I recommend looking into this sooner rather than late – permits book out months in advance.
- Zion Hiking Tip: The bottoms-up hike is rated 2B III on the canyoneering system, so expect to do a little more than just basic hiking. (When done “top-down,” the hike becomes a canyoneering route and is much more technically demanding – you’ll need experience rappelling and climbing.) Rain or snowmelt impacts the hike’s difficulty, so check with the Rangers before your hike to learn the latest news. Much like The Narrows, you’ll need some technical equipment to allow you to safely hike in the water, including trekking poles and neoprene socks. Also consider river walking shoes, like these. You can also rent the proper hiking gear locally from Zion Guru.

Emerald Pools
- Distance: 2.3 miles | Elevation Gain: 662ft | Difficulty: Easy | Trail Guide
The Emerald Pools hike is a much more casual and easy-going day hike, and way more accessible than many of the other Zion hikes. It’s a great little hike that takes you through a variety of scenery and gives you a taste of what hiking in Zion National Park is all about!
And that makes it popular. Very popular.
Maybe it’s the enticing name or the fact that it’s one of the earlier stops on the often very crowded shuttle – or the fact that it’s one of the easiest hikes in Zion. But the Emerald Pools hike gets absolutely packed!
Still, if you’re looking for an entry-level hike in Zion, don’t let that dissuade you. But something you should know: the real attraction of the Emerald Pools hike isn’t the pools themselves, but the views along the way! If you expect the pools to be as jaw-dropping as the Narrows or the Subway, you’re setting yourself up for disappointment. But if you’re looking for gorgeous valley views on a pleasantly gentle trail, the Emerald Pools trail is fantastic.
Truth be told, it consists of two hikes mashed into one: lower emerald pools and upper emerald pools. The trail to the lower pool is only around half a mile or so, but it does gain a bit of altitude.
If you’re still feeling good after you reach the lower Emerald Pool, you can push on further up to the Upper Emerald Pools.
Or, you can make the hike even longer still by linking onto the beautiful Kayenta Trail, which follows the path of the Virgin River briefly and over a bridge before taking you right to the next shuttle stop!
- Editor’s Note: I attempted this hike in mid-July. Because the hike was technically “easy,” I brought along nothing more than a 16-oz bottle of water. But most of the hike is sunny and sandy, and I quickly found myself incredibly dehydrated. Lack of water turned this hike into much more of a challenge than it needed to be! So if you’re hiking during the summer months, bring PLENTY of water – more than you anticipate needing.
- Zion Hiking Tip: There are two more “easy” hikes in Zion that are worth working into your itinerary: Weeping Rock and Canyon Overlook. You can even try to do them all on the same day to get a variety of views!

The Watchman Trail
- Distance: 3.1 miles | Elevation Gain: 646ft | Difficulty: Easy | Trail Guide
Beginning at the Visitor’s Center near the entrance of the park, the Watchman Trail follows the Virgin River along the valley floor before switchbacking up an uphill path to an overlook loop, with views all along the way.
The view at the top into the canyon is stunning at sunrise, as the light hits the top of the rocks and shines with a magical alpenglow.
Because the trail starts at the park’s entrance, you won’t need to board a shuttle – making the Watchman Trail one of the best places to catch sunrise over the Zion valley!
You can also close out your day of hiking in Zion by watching the sunset from the trail – but be sure to begin the hike early enough to give yourself at least 45 minutes to hike back to the trailhead before the sun goes behind the mountains (and pack a headlamp just in case). As a bonus, you’ll see few other hikers on the trail before sunrise or sunset.

Overnight Zion Hikes
Quite possibly one of the most underrated things to do in Zion National Park is backcountry camping. ‘Backpacking’ or ‘backcountry camping’ means that you pack everything you need for camping and basic survival into a backpack and carry it into the wilderness for a day, few days, or weeks with no amenities; just you and mother nature!
As far as hiking goes, overnight hikes are MUCH more challenging than day hikes, primarily because you’ll be carrying an extra 30-or-so pounds of water, food, and camping gear on your back. That’s a huge challenge for your body, and will slow down your typical hiking speed considerably.
So, this probably goes without saying, but please don’t attempt a backcountry trip in Zion National Park without first doing plenty of research and preparation. Doing so puts not only yourself at risk, but also the environment as well as the Rangers who will ultimately have to bail you out if you get in over your head.
I strongly advise against backpacking at Zion National Park without first having experience camping and backpacking closer to home!
That said, if you’re up for it, backpacking is one of the best ways to experience the stillness of Zion Canyon that is often masked by the masses of people that flock here.
Note that these types of trips require wilderness permits that are easily obtained online either through a reservation or a lottery system.
Also, if you are making a backcountry camping trip in Zion National Park or anywhere, please abide by the Leave No Trace Principles to keep nature pristine for everyone! Pack in everything that you pack out – including your waste. (Pringles cans to the rescue!)
A few more important resources that will help: Backpacking Information, Water Sources, Backpacking Safety, and Trail Descriptions & Photos.
La Verkin Creek Trail
La Verkin Creek Trail is an optimal route for beginner backpackers.
The 11-mile, two-day route has designated campsites and two main detours among golden grass, canyon views, juniper trees, pines, and the main creek that you can take to see the second-largest free-standing arch in the world, Kolob Arch, and a stunning red rock canyon carved by a river, Bear Trap Canyon, which is sort of like a mini Zion Narrows experience since you’ll be able to take a dip and see a small waterfall in this slot canyon!
The Narrows (Top-to-Bottom Route)
This 16-mile longer route through the Narrows begins at the top rather than at the bottom from the Temple of Sinawava, the massive red rock amphitheater that “unofficially” marks the entrance to the Zion Narrows.
My favorite feature of this trail is “Wall Street,” the narrowest part of Zion Canyon, and arguably the most beautiful! Walk between canyon walls that tower hundreds of feet and search for Veiled Falls, Floating Rock, Alcoves, Mystery Falls, and the Gateway to the Narrows.
The top-to-bottom route is favorable because you’ll have the entire trail to yourself until you get to the bottom quarter of the trail. This portion of the hike is one of the most secluded trails in Zion National Park!
If you do choose to tackle this trail, you can complete it in a full day, 10-13 hours, or divide it between two using backpacking gear, 12-18 hours.
- Zion Hiking Tip: This overnight trail does require in-advance planning since snatching a permit can get competitive.
The West Rim Trail
This 17-mile trail can be done in either a day (if you’re really fast, I guess) or a more leisurely two-day backpacking trip through the length of Zion National Park.
The best to conquer this trail is going from the top down starting at Lava Point. The trail begins in the upper plateau of Zion canyon and transforms into an epic adventure into the main canyon.
Most travelers that visit don’t get to see the juxtaposition of the upper canyon with its expansive views and lush tree line against the cozy, orange depths of the lower canyon, so this makes for scenic and remarkable adventure!

Where to Stay at Zion National Park
The great thing about staying in or near Zion is that no matter where you pick, the natural scenery is absolutely gorgeous. Staying inside Zion National Park will keep you closer to the action, while staying outside the park will give you a bit more space and some new areas of Utah to explore. I’ve included a few suggestions for both.
Staying in Zion National Park Proper
These spots have the massive plus of being inside the park and in close proximity to the shuttles, so you can be one of the first at the shuttle stops each morning and still have time for your morning cup o’ joe! That said, keep in mind the lodge and the campgrounds have gnarly competition to snag a reservation, especially if you are looking for dates in the summertime or around holidays.
For this reason, if you’re looking to stay centrally in any of these locations, I would start looking at reservations at least six months in advance.
- Zion Lodge: The Zion Lodge is the only lodge inside the national park, and it gives you all the advantages of staying in beautiful surroundings without having to rough it. It’s the best place to stay in Zion if your idea of a National Park retreat is a rustic but comfortable lodge nestled into stunning cliff-faces and trees, possibly with like, a stone fireplace crackling in your room. So you know. Heaven, etc.The lodge itself is rustic and not as grand as lodges in other National Parks; rather, it seems to blend in with the rust-colored sandstone mountains and let nature do the talking. This is also where the Red Rock Grill is located so you will always have a hot meal at your fingertips!
- Watchman Campground: The Watchman is nestled underneath the Watchman Rock Formation, an imposing 6,545-foot sandstone mountain, one of the most photographed features in Zion! Plus, the Virgin River flows nearby, so during the summer months you can slip your swimsuit on and cool off! You’ll be walking distance from the Visitor Center, making it easy to grab one of those first shuttles into the park. The Watchman is open year-round, has electric hooks ups, and is very savvy on utilizing space, so the campsites are laid out similar to a suburban neighborhood meaning your fellow campers are pretty close. The campground is dog friendly and has access to the Pa’rus Trail, a paved trail that runs alongside the river – and the only trail in the park that allows dogs. The only downside to this campsite is that there are no showers, so you’ll have to clean up somewhere in Springdale. Or, since the campground has RV hookups, just rent an RV with a shower, and live your best glamping life!
- South Campground: The South Campground is similar in layout and amenities to the Watchman, but with fewer frills. But you will still have easy access to the Virgin River, Visitor’s Center, shuttle pick-up, and restrooms! The South Campground doesn’t take reservations, so snagging a site here can be much easier than trying for a reservation at the Watchman. Since this site doesn’t take reservations, it’s on a first-come first served basis, so make sure you get here really early to secure a spot. This campground also has RV hookups, so we definitely recommend renting an RV if you plan on staying here.
Places to Stay Near Zion National Park
You don’t have to stay inside Zion National Park itself: there are many unique places to stay just outside the park in Springdale that are just as special! If you’re willing to get up a little earlier to venture into the park, these places to stay near Zion will reward you with space from the crowds and some good old-fashioned charm.
- Canyon Vista Lodge: This place looks like it belongs in the old mining town set at Disneyland’s Big Thunder Mountain. Located in Springdale, Zion NP surrounds the property on three sides and comes equipped with a hot tub, organic fruit trees, riverside patio, fire pit, and a free breakfast from Oscar’s Cafe or Porter’s Smoke House and Grill. There is also a kitchenette where you can whip up tasty snacks and picnic food for your day hikes!
- Off-Grid Tiny Home: On the off chance that you don’t mind staying a small way south of Springdale in Hilldale, Utah, this tiny home is the perfect Pacific Northwestern getaway in the heart of the American Southwest. This adorable, tiny house is set in 40 acres of red rock canyons and is perfectly located to access hiking trails. Roast smores on an open fire and sleep under endless stars. If you want a romantic space to get away from crowds and don’t mind the extra driving distance to get to the park, this is the place to shack up.
Other accommodation options in Springdale range from camping and RV parks to high-end luxury lodge style accommodation. Other good, budget-friendly options include the Pioneer Lodge and the Bumbleberry Inn, which gets major bonus points for having the most adorable name ever.
If you’ve got an RV or are considering renting one from RVShare, there is plenty of boondocking on public land near Zion’s entrances – here’s a great guide.

What to Pack for Hiking in Zion National Park
Before we send you off on your hike, here are the most important must-have day hiking essentials. Bringing the right gear can be the difference between an amazing hike and a 10-hour slog on a blistered foot or a rumbling tummy … or much worse. So prepare! Here’s what you need to bring for your Zion day hikes.
- Never, ever, hike without a compass. If your phone doesn’t get service, if you wander off the trail on accident, or if you’re not good at navigating with things like moss and stars, a compass is the #1 best just-in-case tool you can bring on your hikes!
- 50-100oz of water: Do not skimp on water, especially if you’re hiking in Zion National Park between May and September, when it is insanely hot! This Camelbak Hydration Pack fits 100oz of water, snacks, AND has room for the rest of your gear, too.
- Hiking Shoes & Socks: Lia & Jeremy both hike in Trail Runners rather than heavy duty hiking boots – they’re lightweight and travel friendly, more flexible and comfortable, and they dry super quickly when it rains or after a water crossing (which, spoiler alert, one of the hikes below has quite a few of) so your feet will stay toasty and dry. Pair them with well-made wool socks, like Darn Tough, which are well-earned hiking favorites. They’re soft, durable, and they come with a lifetime guarantee in the event of holes (that’s how you know it’s real). When things start getting wet, pull some waterproof socks on over top of your wool socks to keep your feet dry and blister-free.
- Hiking Clothes: Wool hiking gear is an amazing choice for hikers thanks to its ability to cool you down in the heat and keep you warm when you’re wet or sweaty. Always make sure to bring at least 1 layer, because you never know.
- Hiking Clothing for Her: T-shirt | Sports Bra | Half Zip | Hiking Pants
- Hiking Clothing for Him: Short Sleeve shirt | Long Sleeve Shirt | Hiking Pants
- Snacks: A hungry hike is a miserable hike! Always bring a snack, even for a short hike, just in case your hike goes on longer than planned. You want something nutritious, with a good mix of complex carbs, fats, protein, and electrolytes to fuel your body. My favorite hiking snacks are peanut butter filled pretzels, dried fruit (like apple rings or dried mango), and almonds.
- Headlamps: A headlamp is an important hiking safety must-have, especially if you’ll be starting a hike before sunrise or ending after sunset (even if you don’t exactly plan to). They’re small and lightweight and easily fit in any pack. Bring one. YES, even on a day hike! You never know if you might need it and if you do, you’ll be SO glad you brought it.
- Trekking Poles: Trekking poles are incredibly helpful for difficult terrain or potentially tricky hikes, or if you are a person who is very clumsy (or all 3). I like the Black Diamond trekking poles because they’re lightweight and fold down easily, but they’re super sturdy. Consider them a safety tool that will save your knees on steep down-hills and your wrists & ankles on unstable ground.
- First aid kit: You need a first aid kit that covers you in the event of a variety of calamities. Your first aid kit doesn’t need to be big, but it should have the basics: bandaids, alcohol wipes, waterproof matches, burn treatment, even stuff for stitches. Make sure to include moleskin patches for when you feel a blister coming on.
- Multiple ways to start a fire and filter water: This is a hiking/back-country camping basic, but even on a day hike I recommend at least a little bit of just-in-case coverage. I have a lighter and some waterproof matches tucked into my first aid kit, along with some water purification tablets and this tiny Sawyer water filtration system. Just in case – better safe than sorry, etc. I’m a walking disaster waiting to happen, so I do my best to over-prepare 😉
- Always bring rain gear. Because if you don’t, not only will you be miserable if it starts to rain, but you could potentially open yourself up to a host of other health issues, like pneumonia. This Ultra-Light Rain Jacket is super lightweight and packs down to nothing, taking up almost no space in your pack. Waterproof Socks are also super handy to have, even if your hiking boots are waterproof.
- Radio Signaling Walkie-Talkies: Look, I know these are overkill for most hikes. But the further away from civilization you go, the more these just might save your a$$. Don’t be a statistic about lost hikers in Zion National Park. These bad boys have a 35-mile mountain to valley range, are fully waterproof (and even have a water-activated flashlight, nifty), and have a handy emergency alert button that will sent out a signal the minute you need help. Sure, you’ll probably never need to use them… but think of it as the best insurance policy you’ll ever buy.
Looking for more USA inspiration? We have a MASSIVE travel guide for all our favorite places in the US and handy advice, packing tips and travel guides. Click the link below to download!
Which of these hikes in Zion are you most excited to tackle? Drop us a comment below!
Oh hey, before you go – make sure you check out our guide to all the other awesome things to do in Zion National Park!
Dreaming of more trips to US National Parks? Take a look at some of our other posts:
- The Perfect 2-Day Glacier National Park Itinerary
- The Perfect 10-Day Utah National Parks Road Trip Itinerary: Utah Mighty 5 Road Trip Guide
- 9 Things to Do in Jackson Hole, Wyoming in the Winter
- 14 Epic Things to do in Yosemite National Park, California
Ready to strap on your hiking shoes and hit the trail somewhere scenic? Check out some of our other hiking & outdoor adventure posts!
- 10 Best Hikes in Southern California
- 8 Outdoorsy Things to Do in Ruidoso, New Mexico
- 8 Scenic Day Hikes in the Eastern Sierra Nevadas, California
- 14 Unreal Outdoor Adventures in Carson Valley, Nevada

FOLLOW US!
Hey, did you find this post informative? Save it to refer to later on Pinterest!

Feature photo & pin photo credit: “Vista from the Hidden Canyon Hike in Zion” (CC BY-SA 2.0) by Sarah&Boston
Our Top Travel Tips & Resources
- Booking Flights: To score flight deals, search on Google Flights or Kayak. Money-saving tips: fly mid-week or on the weekend; fly carry-on only on a budget airline; and take red-eyes or early morning flights.
- Accommodations: We usually stay in budget-friendly vacation rentals, boutique hotels or private rooms in hostels. We use Booking.com to book hotels (we love their flexible cancellation policy) and Hostelworld to book hostels (low deposit, easy change/cancellation, and excellent reviews). For vacation rentals, we prefer to book using VRBO because they've got lower fees and better support than Airbnb, and we're not fans of Airbnb's unethical track record. You can also book vacation rentals on Expedia and Hotels.com. We also use TrustedHousesitters as both hosts (for our home and our fur-child) and travelers!
- Travel Insurance: We always, always, ALWAYS buy travel insurance for international trips, and we STRONGLY suggest it - visit our Travel Insurance Guide to find out why. We recommend either World Nomads or SafetyWing for international travel insurance. SafetyWing is one of the few policies that covers Covid-19, and they have excellent monthly policies that are perfect for Digital Nomads and long term travelers!
- Travel Credit Card: We book all of our trips on our favorite travel credit card. Not only do we earn cash back that we can spend on more travel, but the card offers fantastic travel perks like travel insurance, trip delay and cancellation coverage, lost baggage reimbursement, and rental car coverage, which helps protect us on our travels. Learn more here.
- Vaccines & Meds: We use the travel guides on the CDC website to research recommended medications and vaccines for international trips. We always recommend getting every vaccine recommended by the CDC! You can get them at your primary care doctor's office or a walk-in pharmacy.
- Tours: We love booking guided tours, especially food tours and walking tours, to get a local's perspective and a history lesson while sight-seeing! We book our tours using Viator and GetYourGuide.
- Transportation: We use Rome2Rio to figure out how to get from place to place, and book local transportation online using Bookaway wherever we can. When we book a rental car, we use DiscoverCars to compare rental companies and find the best deal.
- Luggage Storage: Whenever we're checking out early or taking advantage of a long layover, we use LuggageHero to safely store our luggage while we're running around. Use the code PRACTICALW for 2 hours of free luggage storage on us.
- VPN Service: A VPN keeps your digital information (like website login details, bank info, etc) safe, even when you're connected to an unsecured network while traveling. Plus, it lets you use Netflix & other streaming sites abroad! We use NordVPN. Use the code WANDERLUSTPROMO when you sign up!
- What to Pack: Here are the travel essentials that we bring on every trip. We also have packing lists for hot weather, cold weather, and many more. Take a look at all of our packing guides!
Samatha Boze says
Zion National Park is one of the coolest places I’ve ever seen! I can’t wait to climb the chains on Angles Landing!
Klay Klemic says
Yes!!! If you’re thinking about coming to Zion- do it! It’s one of the most beautiful places in the world!
shelly johnson says
only 6 people have died from Angel’s Landing hike since 2004…not a person every year.
Lia Garcia says
Duly noted! I’ve changed the post to be more accurate. Thanks for pointing that out!
Hiking People says
In All fairness my husband and I were in the middle of a long trip west. We took in a number of National Parks prior to Zion. Zion was my least favorite out of them all. Yes it has its beauty, but I would have preferred to be able to drive myself. Didn’t take that long to catch a shuttle. Parking wasn’t too bad, but we didn’t arrived until around 3. We did not do any of the long hikes because by the time we got to the end it was getting late & we had done quite a bit of walking earlier in the day at Bryce Canyon not counting the shorter ones there. Zion National Park is Worth the visit even if you just ride the shuttle. Mount Carmel Scenic Hwy coming is was beyond beautiful. Stop in at the Lodge. We were told the mule deer are there every evening.
Lia Garcia says
That’s helpful feedback! I’d probably opt to drive my own car too if parking wasn’t terrible. It’s definitely crucial to arrive early to do most of the long hikes, and to do that you have to be staying really close by and also able to wake up early (always a point of struggle for Jeremy and I)!
Joanne says
Perhaps when I visit again the US, I’ll visit Zion. It sounds amazing, and all the trails you described are very enticing!
Lia Garcia says
It’s definitely up there with the absolute best US National Parks, and IMO the National Parks are one of the best attractions in the USA!
Pete Brahan says
This is such a great resource for Zion. You did a nice job picking out the best hikes to do in the park. We wished we could have hiked the Subway too, but weren’t able to have the time. Observation Point is on our list for our next trip too, since our kids were tired out after Angels Landing and The Narrows.
Thanks for sharing your knowledge of the park!
Natalia says
Your post are always so thorough! It’s much appreciated
Carmelatte says
In love with your photography <3 super!
Lia Garcia says
I can’t take credit for the photos – but this park is just MADE for amazing photographers!
Sandy says
AMAZING! I love your photography!! Thanks for sharing <3
Lia Garcia says
I’m definitely not the photographer so I can’t take any of that credit 😛 but Zion is a great place to practice photography!
Maša says
Wow those photos are just the best!! Pinned it if I ever get a chance to visit this incredible park. Views are killing it 🙂
Lia Garcia says
I didn’t take these photos but I will say that everywhere in Zion is absolutely picture perfect 🙂
Louise says
Wow, Zion looks absolutely incredible! Thanks to Matt for sharing all this helpful information. Pinning this for a future trip to Utah!
Sally says
This is by far the most comprehensive trail guide to Zion National Park that I have ever seen! Thank you for the insider tips. Now that the kids are teenagers, my family is ready to begin conquering parks in the west now, and this one is on our list. I’d love to hike The Narrows & see pools in The Subway and know we have to plan well ahead now. Just how cold was that water?
Sarah Shumate says
I want to go on ALL of these! I’ve been hearing about Zion for years, but have yet to go myself. We are moving back to the US this summer, though, so it’s going on the top of our National Parks list!
Lia Garcia says
Oooh there are so many amazing national parks for you to explore! Jeremy and I have still just barely scratched the surface too.
Jen from The Places We Live says
I spent two years trying to get passes to the Subway. Surprisingly, I was able to get one each year but, each time, it rained and I couldn’t go. I am dying to do all of these hikes!! Thanks for the great advice!
Lia Garcia says
Ahhh that sucks! Third time’s the charm, hopefully?